Thursday, 19 May 2016

Magic Rainbow from Starrily - True Magic in the bottle... and a bit of extra stamping


Hi guys and welcome!


I received some stunning nail mail recently (thank you Anita) and I have to admit, I was quiet keen to try this one.

The pictures on the website are stunning, so I couldn't wait!

Here is the end result:


The first coat went on very easily, but I was kind of disappointed, as it was very, very sheer... For some reason I thought this polish will be more than a topper...


I've seen polishes before building up well with the second coat, so I was optimistic:


The second coat did build up nicely and because of the strong holographic is giving the feeling of full opacity, but I was not entirely happy with so I did  third:


There is not a lot of a difference between two and three coats, but it does gives a bit more depth to the polish.
As you can see on the next picture, it is still quiet see trough, but there is so much going on colour wise in the rainbow, that it doesn't leaves a visible nail line.


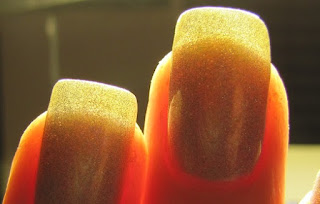
Here is a macro of the stunning rainbow colourfulness:


It's much more colourful in person, but it was just very difficult to capture all the colours.

Originally I was aiming for stamping as well, so I chose this lovely image from the Sugar Bubbles SB 021 plate, and used Moyra black stamping polish along with my beloved clear stamper (all these items mentioned are available on Rainbow Connection)


All in all I'm very happy with the outcome, I love that the colours are changing with every slight movement of the hand!

I hope you enjoyed this post, and thank you for stopping by! XXx


Friday, 13 May 2016

Green gradient with some fun stamping :)

Hi guys!

I'm back with another gradient! :)

I loved yesterday's design so much, that I wanted to do another one this time with different colours. Here is the end result, but there will be a twist at the end, so stay tuned. :)


As a base coat I used Nailtiques Formula2 to help my nails to recover from the damage caused by the extreme weather change.


Of course the all important liquid latex is always on side to keep cleaning up to a minimum. Love the stuff! :)


For this gradient I used three polishes from OPI. The colours are: Alpine Snow, That's Hula-rious! and My Dogsled is a Hybrid.

Yesterdays slight disaster thought me something, so this time I was actually experimenting with colours, and changed one of the greens as the stamping polish was not quiet visible on it. I like that I changed it, this colour combo is so much more spring-like.

First I applied a layer of the white to help the colours pop.


Using the end of a make up sponge I slowly started to build up the layers of the gradient. I had some issues with the pulling again, but as with so many other nail art this also needs a lot of practice! Not to mention that the application may vary with different brands. OPI did blended better this time than China Glaze with my previous design.

After 3-4 coats of sponging I was happy with the opacity of the colours.


When I was looking trough my stamping plates I instantly fell in love with this image. For some reason it reminds me of lianas from the jungle so actually I choose the green colours after I chose the image. :) Crazy, I know... :)

I would like to mention it here, that I love all the stamping polishes from Esmaltes da Kelly! They are insanely pigmented, the most opaque colours I ever came across, and just a dream to work with. Today I used Helix which is a stunning dark green holographic polish.

Not to forget about the clear stamper from Rainbow Connection, which quickly became my favourite, and I use it all the time!


I did a quick clean up, and applied a topcoat. Ta-dah, the beautiful green crazyness is alive! I really really love it!!! :)


After having the shiny version on for a day, I just applied a matte topcoat. I don't understand why I was not using any of that stuff before! I'm loving the effect!


If you are wondering, I used Fab Ur Nails FUN16 plate for the stamping also available at RC :)


All in all I absolutely enjoyed doing this gradient, and I already got the next one in my mind! :)
Please let me know in the comments if you want to see a tutorial how I do a gradient, as I'm playing with the idea to make some videos for you as well.

I hope you enjoyed this post, and thank you so much for stopping by! Xxx


Thursday, 12 May 2016

Contribution to the ME/CFS & Fibro Awareness

Hi guys!

Here I have my manicure to share with you for the ME/CFS & Fibro Awareness day:


May 12th has been designated as International Awareness Day for Chronic Immunological and Neurological Diseases (CIND) since 1992. The CIND illnesses include Myalgic Encephalomyelitis (ME), Chronic Fatigue Syndrome (CFS), Fibromyalgia (FM), Gulf War Syndrome (GWS) and Multiple Chemical Sensitivity (MCS).
May 12th was chosen as it is the birthday of Florence Nightingale. She was believed to have suffered from ME/CFS. If you want to know more about the cause or the illnesses, visit this website: http://www.may12th.org/

I am a member of an awesome nail polish loving community, and one day Becca from A Certain Becca Nails and Kirsty from FairyTales Nails created a Facebook page to spread the word and make more people aware of this day and the illnesses behind.

As I suffered from a non-visible illness a few years ago I know how important it is to share the information with more and more people.

This form of contribution was also amazing, as we could chose to come up with a manicure themed by the awarenesses colours blue and purple, and also their symbols of butterflies and the ribbon.

I knew I wanted to do a gradient, so I choose a white, a light purple and a dark purple.


All three colours are from China Glaze: White on White, Lotus Begin and Mix and Mingle. I protected my skin around my nails with liquid latex and used a make up sponge to slowly build up the layers of polishes. They did not blend that well, and the sponge picked up some of the polish from the previous layer, but the end result is pretty good. 

After a quick clean up I applied a topcoat to smooth out the lumps and bumps from the sponge.
I was not sure what colour to stamp with, so I tried EDKs Andromeda, but it was not showing as much as I wanted. Eventually I went for black, but definitely will experiment with colours more in the future.

After I finished stamping, cleaned a bit again, and started to apply topcoat to my pinky, and thought, hey, this would look amazing in matte. So I grabbed my OPI matte topcoat, what instantly smeared my design on my ring finger... Grrrr... Lesson learned! Guys, be careful if you are using OPI's matte topcoat, and maybe apply your regular topcoat before using it to avoid any smearing!

I had difficulties with the stamping, although I use the polish and the stampers regularly, so it might be the plate, or the fact, that my sliding door is open in the living room :)

I have to admit, I like it even better than I thought I will, so even if it takes time and patience, I'm just about to start another one! :)

Here is the end result:


All in all I'm very happy with it, and convinced myself to do more gradients in the future!

I hope you liked this post, and thank you for stopping by! Xxx


Monday, 9 May 2016

Blue and white water marble manicure for Karen

Hi guys! :)

Here I have a very exciting post for you!

I had the pleasure to spend time with my friend Karen and after a hard day of shopping some nail polish, visiting Lush and going trough my collection of polishes, we decided, that I do a manicure for her.

I kind of knew what she will go for, but as she was the guest, I let her choose the method and also the polishes.
We both do love water marble, and I definitely enjoy it even more if I can do it for someone else!

She choose two shades of blue from Colors by Llarowe - Soccer Mum and CBL Addicts Blue Me Away - and also a white (I used my trusted White on White from China Glaze).
I decided to do a chevron design on her nails.

Here is the end result, but if you want to know how I (we) did it, just keep reading! :)


We were talking about forever that I might do her nails once we have enough time, so this was a kind of: ok, it's 5pm, but let's do it! :)

Unfortunately I had to take her beautiful Lilypad Lacquer off... :(

First I started with a nice basic manicure shaping and filing her nails. I also removed the cuticles around which were not invited to the party! As a base coat I used my beloved Stuck on Blu from Glisten & Glow.


Actually I love her nails, they are long, strong, beautiful and healthy! :)

Until the one coat of Soccer Mum was drying, I quickly applied some liquid latex to keep cleaning up to a minimum, and started to build the bulls eye. :)

Here is a picture of one of the dips:


Yes, it is awkward, and required a lot of coordination from both of us, but we had such a good laugh!

After her hand was done it looked like a big mess, but if you ever try water marble and got this result, don't be afraid, it will come out just amazing!!!


May I just mention it here, that she started to cement her face in a huge smile, and behaved like a kid in the candy store, what was the biggest compliment for me!!!

Eventually I stopped torturing her, and cleaned up the mess I created, and gave her a shiny topcoat.

I have to admit, this is one of my most loved water marbles I ever did for someone else!!!


I really hope sweetheart, that you do enjoy your beautiful nails for a long time, and hope to see you again soon!!! :)

As some of you might know, Colors by Llarowe is my favourite Indie brand, and I love the fact that Leah Ann's polishes are not just stunning, they apply like a dream, and even the holographic ones are great for water marble!!!

I absolutely enjoyed doing this design, and I hope that there is lot more to come! )


Thank you very much for stopping buy, and I hope you enjoyed this post! Xxx