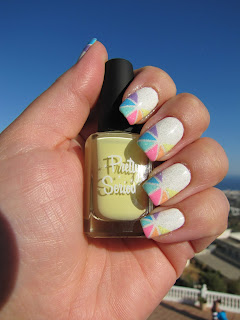
Today I would like to share the step by step tutorial of a recreation with you. I saw this design on Mysimplelittlepleasures's YouTube channel. Although I do love Colette's creations, and nearly every time I say: "Yes, one day I will do this!" This one was just instant Summer for me, I knew I had to do it! :)
I took a lot of polishes with me for holiday, including the whole pastel neon Pet Names Collection from Pretty Serious. Love these polishes! Amazing colours, very pigmented, and easy to work with! You can find them at Rainbow Connection.
Here is a picture of all the products used for this design:
I know, it's a lot! :) But it's so worth it! :)
First I started with a re-freshed manicure and my all time favorite Nailtiques Formula2 base coat.
For a base colour I used two coats of the beautiful "Wedding Gown White" from Glisten&Glow.
I also applied a layer of fast drying top coat, as for this design I will use striping tape. I like to pre-cut all the pieces, so when it comes to the time, it's easy to use them:
Now the fun begins! :) With the striping tape placed, the design starts to take shape:
After that I started to fill in the little triangles with different colours. I used one drop of polish on a piece of foil, and also a tiny nail art brush:
Hubby made a picture of me in action:
Once all the colours were filled in I carefully removed the striping tape, and left enough time them to dry.
As a last touch I did a bit of clean up and one coat of a glossy quick dry topcoat:
All in all I really enjoyed doing this nail design. It's unique, very colourful and fun. Not gonna lie, I felt like it takes me light years to do it, but I absolutely love the result, and had a lot of compliments.
I was wondering how it would look like with a matte topcoat, but I haven't got any with me...
Thank you again to Colette for sharing her design, I hope to do more in the future!
Thank you very much for stopping by, I hope you enjoyed reading! See you soon! Xxx


That's fab!
ReplyDeleteThank you Amanda! :)
Delete